VLANS:
Let’s see how the concept of VLAN came into the
play. Assume that we have a 24 port switch and there are 4 departments each
consisting of 6 PC’s and all of them are connected to the switch on its all 24
ports.
Assume we just
made physical connections. Now let us say if a device in 1st
department wants to speak/connect to a device in 2nd department,
since switch doesn’t know the mac address of the devices in 2nd
department it will flood the frame. Now due this flooding all the remaining 23 ports/devices
are also receiving this frame.
Like this, if a
large number of broadcasts (flooding) happen, the CPU cycles of switch are
wasted and also bandwidth.
So in-order to
minimize these problems people came up with a solution called virtual LANs. VLAN’s is
nothing but making one switch to logically function as many switches (or
breaking the single broadcast domain into multiple, as we need).
Now if a device
in 1st department wants to connect to a device in 2nd
department, since switch doesn’t know the mac address of the device in 2nd
department it will flood the frame. But here the frame will be flooded for only
that department i.e., nothing but the frame will be flooded in only that VLAN. This
is how the concept of VLAN born.
And also VLAN’s
are used to separate the traffic types like VoIP, Video and management traffic
which are very important and sensitive for the variations. If all this traffic
is not seperated and a large number of broadcasts are happening then this traffic
(VoIP and Video) will be interrupted a lot and the users will experience voice
delay issues and jumbling videos.
Finally, a VLAN
is used for logically grouping devices and also called as a broadcast domain
(isolates different types of traffic). By default all the ports of a switch are
in VLAN1.
Benefits of VLAN’s:
- VLANs are independent of physical locations. That means you can have one vlan created in ‘n’ number of switches at different locations. And the devices in that VLAN can communicate directly without any layer3 device, if all the switches are directly connected.
- VLANs help to improve security features. For example if you don’t want people in a VLAN to connect to the internet, you can just use ACL on a router for that VLAN.
- Since devices in one VLAN cannot communicate directly to devices in other VLANs. So they’ve to go through a Layer3 device in-order to commute, it helps network administrators to filter the traffic.
- VLANs can also be used to separate different kinds of traffic as I said above, like VoIP traffic used be voice calls, Multicast traffic which is commonly used by video applications, and Network management traffic includes SNMP (Simple Network Management Protocol), STP (Spanning Tree Protocol), BPDU’s (Bridge Protocol Data Units) and CDP (Cisco Discovery Protocol) messages.. Etc. If we use VLAN’s to separate this type of traffics with a correct QoS (Quality of Service) we don’t see any disturbance in the voice or video because they’re very sensitive.
As i said that by default all the ports of switch will be in VLAN1, along with VLAN1 there are some more VLANs on every switch by default.
Let’s take a look at them.
The command to see the VLAN information is “show vlan”; it can be used in user and privilege exec levels.
Here is the output from a switch named as switch0:
switch0>show vlan

From the output we can come to know that, by default there are five
VLAN’s on the switch: VLAN1 and VLANs 1002, 1003, 1004, 1005 (These will be
explained later).
The output shows the VLAN Id (number), name, status and ports that are
in that particular VLAN. If you’ve observed, all the ports on switch are now in
VLAN1, by default.
Now let’s see how to create a
VLAN:
VLANs can be created in global configuration mode with command “vlan <vlan id>”
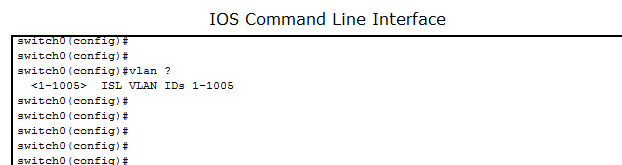
Here it shows that this switch supports 1005 VLANs.
To create a vlan:
switch0(config)#vlan 2 //
Creates VLAN2
switch0(config-vlan)#? //
Now we’re in VLAN2 prompt
VLAN configuration commands:
exit Apply
changes, bump revision number, and exit mode
name Ascii name of
the VLAN
no Negate
a command or set its defaults
switch0(config-vlan)#
- If you want to exit from VLAN2 then use exit command.
- If you want to give a name to this VLAN2 use the name command. Let’s see what name will switch uses for VLAN2 by default.
-----------------------
switch0#show vlan id 2 //
This command shows about only vlan2

By default switch assigned name as VLAN0002 for
VLAN2, similarly for VLAN3 it will assign name as VLAN0003 and so on…
- If you want to remove the VLAN name that you assigned with the "name" command, just prefix it with “no” .
switch0(config-vlan)#no ?
name Ascii name of the VLAN
switch0(config-vlan)#no name // Assigns the default name for that
VLAN as per switch
switch0(config-vlan)#
Naming VLANs:
Now let us name our VLAN2 as LAB2. The command flow like this:
switch0#configure terminal
switch0(config)#vlan 2
switch0(config-vlan)#name LAB2 //
Naming VLAN2 as LAB2
switch0(config-vlan)#
Let’s see the changes with show commands:
switch0#show vlan id 2
VLAN Name
Status Ports
---- -------------------------------- ---------
-------------------------------
2 LAB2 active
VLAN Type SAID MTU
Parent RingNo BridgeNo Stp
BrdgMode Trans1 Trans2
---- ----- ---------- ----- ------ ------ -------- ---- --------
------ ------
2 enet 100002
1500 - -
- - -
0 0
switch0(config-vlan)#
Now VLAN2 is named as LAB2.
Now we can see the details
about VLAN2 with the name also as shown below:
----------------------
switch0#show vlan name LAB2 //Using VLAN name to see
details
VLAN Name
Status Ports
---- -------------------------------- ---------
-------------------------------
2 LAB2 active
VLAN Type SAID MTU
Parent RingNo BridgeNo Stp
BrdgMode Trans1 Trans2
---- ----- ---------- ----- ------ ------ -------- ---- --------
------ ------
2 enet 100002
1500 - -
- - -
0 0
switch0#
-----------------------------
Deleting VLAN’s
To delete a VLAN just prefix ‘no’ to the ‘vlan creation command’.
Let’s see how to delete our vlan2 i.e. LAB2 vlan.
switch0(config)#no vlan 2 //
Deletes VLAN2
Let’s check whether vlan2 is deleted or not:
switch0#show vlan brief
VLAN Name
Status Ports
---- -------------------------------- ---------
-------------------------------
1 default active Fa0/1, Fa0/2, Fa0/3, Fa0/4
Fa0/5, Fa0/6, Fa0/7, Fa0/8
Fa0/9,
Fa0/10, Fa0/11, Fa0/12
Fa0/13, Fa0/14, Fa0/15, Fa0/16
Fa0/17, Fa0/18, Fa0/19, Fa0/20
Fa0/21, Fa0/22,
Fa0/23, Fa0/24
Gig1/1, Gig1/2
1002 fddi-default
active
1003 token-ring-default
active
1004 fddinet-default
active
1005 trnet-default
active
switch0#
So here our LAB2 VLAN is deleted. But if we delete a VLAN like this
there will be some issues. Let’s take a look at them.
Precautions to be taken before deleting a VLAN:
Precautions to be taken before deleting a VLAN:
In order to understand what issues we will generate by deleting a VLAN
/ to know what precautions we should take before deleting a VLAN.
Let’s create a
VLAN (VLAN2) and move some ports into that VLAN and then delete that VLAN and
observe the issues.
Creating VLAN2 with name LAB2:
switch0(config)#vlan 2
switch0(config-vlan)#name LAB2
switch0(config-vlan)#exit
Moving/assigning ports Fa0/11
to Fa0/20 into VLAN2:
We can move a set
of interfaces using the “range” parameter as shown below.
“interface range fastEthernet
0/11 - fastEthernet 0/20”

“switchport access vlan 2” //Moves all these ports into VLAN2
Let’s verify whether a VLAN2 is
created with name LAB2 and also the ports that are in VLAN2:

- Remember VLAN names are case sensitive, here it didn’t worked for ‘lab2’ whereas it worked for ‘LAB2’
Here the output shows that VLAN2 has a name LAB2 and the ports from
Fa0/11 to Fa0/20 are in this vlan, as per our configuration.
Since I moved the ports Fa0/11 to Fa0/20 into VLAN2, all the devices that are connected to these ports will be in VLAN2 i.e. LAB2 VLAN. And the remaining ports are in default VLAN i.e. VLAN1.
Since I moved the ports Fa0/11 to Fa0/20 into VLAN2, all the devices that are connected to these ports will be in VLAN2 i.e. LAB2 VLAN. And the remaining ports are in default VLAN i.e. VLAN1.
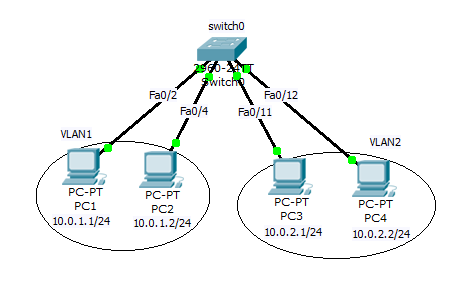
I’m just connecting the PCs to the ports on our switch0. And here is our topology. (I will take this topology to explain all the
concepts of VLAN and add more devices as per the requirement of explanation.)

Now let’s delete VLAN2 and then save the configuration and see what happens:

Saving config:

Let cross check whether it is deleted or not

Here we are seeing that VLAN2 is deleted, that’s fine. But the
question here is where the ports Fa0/11 to Fa0/20 have gone. They’re not even
showing up in default vlan VLAN1.
And also after deleting the VLAN2, the VLAN2 ports
Fa0/11 and Fa0/12 which are connected to PC3 and PC4 turned into amber. Here is
the pic.

switch0#reload //Restarting switch
Proceed with reload? [confirm]
switch0>show vlan brief // Checking after switch has rebooted

After the switch has rebooted, the deleted VLAN2 has come back with
default VLAN name (VLAN0002 not LAB2) and the ports Fa0/11 and Fa0/12 are showing
green. So that means we cannot
delete a VLAN when there are some ports assigned to it.
Here is the pic now:
For the confirmation purpose lets create another VLAN called VLAN3 and
then delete both VLAN2 and VLAN3 and see what happens:
Creating VLAN3 and checking it:
switch0(config)#vlan 3
switch0(config-vlan)#exit

Now let’s delete VLAN2 and
VLAN3. And see if vlan3 is also coming back.
switch0(config)#no vlan 3
switch0(config)#no vlan 2
switch0(config)#END
switch0#
%SYS-5-CONFIG_I: Configured from console by console
Checking:
switch0#show vlan brief

There are no VLAN2 and VLAN3. Now let’s save the configuration and
reload the switch and check again.
switch0#wr //
Saving config
Building configuration...
[OK]
switch0#reload
Verification of deleted
VLANs:

Now the VLAN3 is deleted but VLAN2 has come back. So now it is
confirmed that we cannot delete a VLAN when it has some ports assigned to it.
Note: This LAB is
done in PT, but when I checked with the network engineers they said that when
we delete a VLAN all the ports that are assigned to that particular VLAN will
be redirected to the default VLAN (VLAN1).
So finally we understood before we delete a VLAN, as a precaution we
should move all the ports in that VLAN to desired ones. If else we may have
face connectivity issues.
Different methods for
assigning ports to VLANs:
A port can be assigned to a VLAN in three ways static, dynamic and
voice.
In STATIC METHOD, we have
to enter into the interface sub configuration mode and then assign that port to
a particular VLAN. Just like we did above.
The command to
assign a port to a VLAN is: “switchport
access vlan <Id>”
For example, if we want to assign Fa0/11 port to VLAN20, then first we’ve
to enter into the interface sub-configuration mode of Fa0/11 port and then use
the above command, as shown below:
switch0#configure terminal
Enter configuration commands, one per line. End with CNTL/Z.
switch0(config)#interface
fastEthernet 0/11 // Entering into Interface subconfig
mode
switch0(config-if)#switchport access vlan
20
% Access VLAN does not exist. Creating vlan 20 // Created vlan20, since it was not present
switch0(config-if)#end
switch0#
%SYS-5-CONFIG_I: Configured from console by console
switch0#wr
Building configuration...
[OK]
Now any device that is connected to Fa0/11 port will be in VLAN20. And
a port can only be assigned to one VLAN only.
In DYNAMIC METHOD, the
switch automatically assigns its ports to VLANs based on the MAC address of the
device, IP Address...etc... There are
two methods to implement dynamic VLAN assignments, one is through making a high
end switch (Eg: Catalyst 6500) to act as a VMPS (Vlan membership policy server)
and the second option is through 802.1 x authentication (Configuring dynamic
VLAN’s is beyond this post).
VOICE VLANS are used only
by VoIP phones. Some switches will have voice ports, which when plugged a device into it, switch will move it into voice VLAN (We will discuss more on this later).
So which is best, static
assignment or Dynamic assignments? Let’s take a look.
1. Static VLANs are easy to configure.
2. Static VLANs add some more work to the admin. Let’s say if a PC is disconnected from one port and connected to the some other port, with static method admin has to manually assign that PC to the appropriate VLAN that the PC belongs to.
1. Static VLANs are easy to configure.
2. Static VLANs add some more work to the admin. Let’s say if a PC is disconnected from one port and connected to the some other port, with static method admin has to manually assign that PC to the appropriate VLAN that the PC belongs to.
1. Dynamic VLAN configuration is a bit tedious process and it includes a lot of initial preparation.
2. The main advantage of dynamic VLAN assignment method is, if a PC is removed from one port and connected to some other port; in dynamic VLANs the switch assigns the PC to an appropriate VLAN. Here no need of manual configuration for this as in static method.
Next post will continue about "Working with VLANs"
No comments:
Post a Comment